Friday, January 27, 2012

Happy Brrrr...thday to You!

It's another TGIF for my fellow bloggers.  Today, I am excited to share with you my snowman card.  It is part of the current "snowman" die cut challenge over at Stuck On U Sketches.  I hope you'll stop by there to see what the design team has come up with and then decide to play along with your own snowman creation.  Here is a link to the challenge.

This card was my son-in-law's birthday card.  He is a wonderful singer, a youth pastor, and has been helping with the praise band at his church recently.  So, I knew he would enjoy getting a singing snowman for his birthday.  I had recently seen singing reindeer cards that were made from punches, and when I saw them, I knew I wanted to give it a shot.  I decided to try a snowman instead of a reindeer, and I used my Cricut instead of all punches.  Here are the details:

Size:  4 1/4" x  6 1/4"
Patterned papers:  DCWV for the checked background.  I used the Wonderful Winter pad by My Mind's Eye for the tree paper (it's hard to see in this photo).
Card:  Campin' Critters Cricut cartridge cut at 6 1/4"; I also cut the front of the card using the shift of the "sign" feature at 6" to get a little smaller card front.   I love the cool card shapes on this cartridge that are included in the "sign" feature.
Snowman:  I cut one 2" oval, one 2" circle, and one 2 1/4" circle using the George Cricut cartridge.  The snowman's mouth is an oval Stampin' Up Paper Shapers punch.  I punched another oval in red and used a heart punch to make the shape for the tongue.  I then punched another oval in white and used the very top piece of it and drew lines to make the snowman's teeth.  Do snowmen have teeth?  I guess this one does!  LOL.  I used the snowman's arms from the Christmas Cheer cartridge cut at 3 3/4".  The snowman's nose was hand cut.  I punched a 2" circle and then punched a 1 1/2" circle from the 2" circle, as well as a small oval punch, to make the snowman's ear muffs.
Book:  Learning Curve cut at 1 3/4".  I printed the "First Baptist of Mayodan" on my computer and used a postage stamp punch to add it to the front of the book.
I used a Fiskars scalloped border punch for the border.
I printed the sentiment on my computer and used a Paper Shapers punch for the words.
I then added a piece of ribbon, a button, and baker's twine to finish the card off.

I hope you like it.  Thanks for your comments.  Be inspired!


Click on the photo for a better look.


Monday, January 23, 2012

Pet Sympathy Card

I made this pet sympathy card for our neighbors who had to have their beloved rat terrier put down a couple of weeks ago.  They are an elderly couple, and they adored their dog.  So, I made an apple cobbler and took it to them, along with this card to let them know how sorry my husband and I are for their loss.  Here are the details:

Size:  4 1/4" x 6 1/2"
Card stock:  Recollections, American Crafts
Clouds:  Fiskars punch
Butterflies:  Martha Stewart punch
Flowers:  Paper Shapers punch with circles punched and added for centers
Leaves:  Martha Stewart leaf punch.  I cut the top of one off and glued two together to make the taller flower.
Grass:  Fiskars border punch
Dog:  Nate's ABCs Cricut cartridge cut at 2 1/4".  This was the font 2 feature on page 60 of the handbook.  I liked that it had a shadow.  I cut two shadow layers and separated them with pop up dots.  I also cut the dog in both black and white, since their dog was black and white.  I hand cut the black pieces from the black dog and glued them in place.  I also punched a tiny circle and used it for the dog's eye.
Sentiment:  I found this on a pet sympathy website.  I printed it directly onto my patterned paper using Word.

Thanks for your comments.  Be inspired!


Click on the photo for a better look.


Friday, January 20, 2012

God's Promises Sympathy Card

TGIF everyone!  I am sharing a sympathy card I just made for a co-worker whose mother passed away recently. Here are the details:

Size:  A2
Card Stock:  American Crafts, Bazzill, DCWV
Embossing:  Cuttlebug Heritage set
Cross:  Spellbinders die (I layered it on a Martha Stewart punched shape that I purchased at Ross for $3!) and then added a pearl
Label:  Elegant Edges Cricut cartridge cut at 3 3/4" using the oblong frame feature
Flowers:  Recollections
Leaves:  Martha Stewart punch
Inside verse:  "But He did promise strength for the day, comfort for the tears, and light for the way."

Thanks for looking and for your comments.  As always, be inspired!


Click on the photo for a better look!


Monday, January 16, 2012

Thinking Of You

Today I am sharing with you a card I made for my daughter's friend, whose husband was recently deployed to Afghanistan.  They have only been married a little over a year, and he will be gone one year.  He is in the Marines, and she has moved out of their apartment (I don't think they would let her live there while he was deployed), and has moved back home with her parents.  I wanted her to know that I was thinking of her, and praying for both of them.  She received the card and sent me a message to let me know how much it meant to her.  It makes me feel so good to know that one of my cards lifted someone's spirits!  Here are the details:

Size: A2
Card Stock:  American Crafts, Bazzill
Embossing:  Cuttlebug (Heritage set)
Flower:  Recollections
Flower Die Cut:  Martha Stewart Birthday Cake Art Cricut cartridge cut at 3" (see page 40 of the handbook) (I think).  I cut three layers to give it dimension, and love how it turned out.
Sentiment:  Computer generated and cut using a Spellbinders tag die
Pearls:  Unknown.

Thanks so much for looking.  I hope you like it.  Be inspired!


Click on the photo for a better look.


Friday, January 13, 2012

Let The Fun Begin!

TGIF!  And I am excited to share with you a new die cut challenge over at Stuck On U Sketches.  Our challenge was to use the theme "Winter Fun" as the starting point for our project.  I have this new window die, and I envisioned a child's delight in seeing new fallen snow.  Thus, my card tries to reflect that.  I hope you'll check it out here and join us!  And we have an exciting sponsor!  Whimsical Designs is sponsoring SOUS for the remainder of the month!  You won't want to miss it!

Here are details about my card:

Size:  4 1/2" x 6 1/2"
Card Stock:  Core'dinations; Bazzill; American Crafts
Patterned papers:  DCWV; unknown for the blue/white polka dot paper for the sky -- I've had it for years!
Tree:  Paper Dolls Dress Up cut at 1 3/4" (page 52)
Snow:  I used my Creative Memories Curvy Paper Trimmer (can't remember the exact name, but I think it is retired) to cut the wavy lines for the snow.  I then chalked the edges in blue.Window:  Two of the Small Madison Window Dies put together
Boy:   A Child's Year cut at 2 3/4".  I took the boy standing at a chalkboard and cut the chalkboard lines off.
Window treatment:  A Fiskars border punch
Senetiment:  Computer generated and punched using a Stampin' Up punch

Thanks so much for looking and for any comments you leave.  Don't forget to come join us!  Be inspired!


Click on the photo for a better look.

Tuesday, January 10, 2012

Happy Birthday Card for an 80 Year Old

Hello bloggers.  I am sharing with you a birthday card made for my son-in-law's grandmother.  My son-in-law's Mom sent an email out asking for birthday cards for her Mom, whose birthday was a few weeks ago.  She was turning 80, and her daughter wanted her to receive 80 birthday cards. This is the card I made for her.

Also, I am entering this card into the current challenge over at the City Crafter Challenge blog. The challenge is to use a black silhouette. Check it out here.

Patterned papers:  My Mind's Eye
Card Stock:  Recollections and American Crafts
Ribbon:  Unknown
Window:  Small Madison Window Die
Border:  Fiskars border punch
Girl with bird:  A Child's Year Cricut cartridge (I cannot remember the size -- I am SO sorry!)
Pearls:  Queen and Co.
Sentiment:  Computer generated and punched with a 1 1/2" circle punch and a 2" scalloped circle punch (with a little Stickles added)

Thanks for looking.  Be inspired!

Click on the photo for a better look!


Wednesday, January 4, 2012

Flowers and Birthdays

I hope everyone's year has started off to be fantastic!  I personally am ready for spring, and we haven't even had any snow.  I'm just a spring, summer and fall kind of gal.  I hate being cold!

I am sharing with you today a birthday card for a very dear friend.  I made this card a month ago, so I hope I remember the correct sizes.  I am so far behind in posting!  Here are the details.

Size:  A2
Card Stock:  Recollections, Core'dinations
Patterned Papers:  My Mind's Eye
Bird:  This was on one of my scrapbook papers and was so cute, I decided to use it as my focal point of the card.  So easy!
Frame:  Elegant Edges Cricut cartridge cut at 3".  I then embossed the frame using my Cuttlebug.
Flowers:  Flower Shoppe Cricut cartridge.  I think these were the scalloped flowers, and they were cut at 4" and 3 1/2" (pink).
Leaves:  Spellbinders die
Sentiment:  Computer generated and punched with a 1 1/2" circle and a 2" scalloped circle. I then added a little Stickles.
Ribbon:  Unknown -- from my stash.
I added pearls in the corners and used a new Fiskars corner punch to add a little extra touch at the bottom.

I hope you like it.  If you take the time to comment, thank you!!!

Be inspired!

Click on the photo to get a better look!


Friday, December 30, 2011

Christmas and Snowflakes

Who doesn't love snowflakes when thinking about Christmas?  This card is for my wonderful in-laws.  The family gave them money for Christmas (mainly because we couldn't think of anything else to give them).  They can spend it on a trip or for unexpected expenses.   There is a spot on the inside to stash the money.  Also, this card was made for the latest die cut challenge over at Stuck On U Sketches.  We were to use snowflakes.  Here is how I made the card:

Size:  4" x 7"
Card stock:  Core'dinations and American Crafts
Patterned papers:  My Mind's Eye Wonderful Winter pad
Snowflakes:  I used three different punches for the snowflakes around the sentiment, including Martha Stewart and a Paper Shapers punch.  The snowflake border was cut using the Martha Stewart Seasonal Cake Cartridge.  I cut it using the "cut to length" feature at 4", which ended up cutting it at 2 1/2".  I cut the top layer twice and used pop up dots.  I also ran it through my Cuttlebug using the Swiss Dots embossing folder.  I then used a 3/4" circle punch for the red centers.
The verse is my own creation, using a verse I found on the internet as a starting point.  I attempted to make the words look like a Christmas tree.  Did it work?  LOL.  I used a large circle Spellbinders Nestabilities die to cut the sentiment and then added a Nestabilities Lacey Circle behind it.

Hope you like it.  Come join us in the fun and try this snowflake challenge! Check it out here.
Be inspired!

Click on the picture for a better look.


Friday, December 23, 2011

Christmas Blessings

I am sharing with you a Christmas card I made for my boss.  In fact, it is the only Christmas card I made!  I was giving him gift cards for Christmas, so I needed a way to give them to him.  I just don't think I can purchase a card in a store again, so this one was quickly done.  Here are the details:

Size:  4" x 9"
Papers:  Card stock:  Recollections and Bazzill
Patterned Paper:  Wonderful Winter by My Mind's Eye from a couple of years ago.
Christmas Bell Ornament:  Jolly Holidays Cricut Lite cartridge cut at 3"
Oval Label Behind Ornament:  Nestabilities
Snowflakes:  Paper Shapers punch with added gems from my stash
Border:  Spellbinders Fleur De Lis Doily Accents
Sentiment:  Computer generated and punched using a 1" circle punch and a 1 1/2" scalloped circle punch.  I then added some Stickles.

Hope you like it.  Be inspired!


Monday, December 19, 2011

It's Your Day!

I am sharing with you today a card I made over a month ago for a co-worker.  I've been so busy that I'm just now getting around to posting pictures of it.  It certainly isn't a really fancy card, but she liked it, and that is the most important thing.  Here are the details as I remember them (since it's been so long ago).

Size:  5 1/4" x 5 1/4"
Patterned papers:  Recollections
Card stock:  Bazzill, Recollections and American Crafts
Flowers:  Prima (I used a large glass brad for the center)
Flourish:  Storybook Cricut cartridge cut at 2 1/4"
Sentiment:  Computer generated and punched with a Stampin' Up Punch
Pearls:  Queen & Co.
Ribbon:  Unknown.


Be inspired!

Monday, December 12, 2011

Praying For You

I have been busy, busy, busy!  I suppose the season is upon us to be busy, huh?  I love the Christmas season though!  This is a card I made a few weeks ago for a lady who attends our church who fell and broke a rib.  I used the Inspired Heart Cricut Lite cartridge (cut at 4 1/2"), along with a flower punch and a branch punch.  I embossed the top white layer as well.  Pretty simple, huh?  But I liked the end result.  This cartridge has lots of great, simple cuts for making get well and sympathy cards.

Hope you like it.  It's been pretty quiet around here lately.  I'm not sure why.  I miss the comments though!  Be inspired!


Tuesday, December 6, 2011

Sending Birthday Wishes

Happy Tuesday bloggers!  Today I am sharing with you a birthday card I recently made for a former co-worker.  This friend is battling cancer, and the doctors have actually told her that she only has a couple of months to live.  If you are a praying person, I ask that you pray for her.  Her name is Tori.

I made the card to be sent from a bunch of people.  I cut an extra layer and glued it on the inside left of the card with a place to lift it up to allow more signatures.  We placed it in a central location in the office and had lots of people sign it.  I thought it would brighten her day to know that we were all thinking of her and care for her.  Here are the details of the card:

Size:  A2 (approx.)
Card stock:  Bazzill
Patterned papers:  My Mind's Eye
Card shape:  Wrap It Up cartridge cut using the card feature and cut at 5 1/4" (I think -- I made it two weeks ago.)  I was very happy to find that the layers from the main image on that page (page  31 of the handbook) fit onto the card feature.  So, I was able to cut layers in different papers.
Pearls:  Strand pearls that I purchased in the ribbon section at Hobby Lobby, and the individual pearls are Recollections.
Rose:  Recollections
Flourish:  Jolee's
Sentiment:  Computer generated
I added a little Stickles to the flames for a touch of bling, and it was done!


Thanks for looking, and be inspired!

Friday, December 2, 2011

My Funky Flower Yarn Christmas Tree

Happy Friday!  I am sharing with you today my project for the latest die cut challenge over at Stuck On U Sketches.  Our theme is "O Christmas Tree."  Sounds simple enough, right?  My only problem was that I had a vision in my head that didn't come to pass.  I love the yarn Christmas trees I have seen on Pinterest.  They are each unique.  And so is mine.  :o)  It is definitely funky.  And fun.

Here are the details:

I started with a white Styrofoam Christmas tree (this one is approximately 12 inches tall) purchased at Michaels.  I bought some thick white yarn and wrapped it around the entire tree, using my hot glue gun along the way.  I then added a string of little white pearls (which you can see in the closeup below).  I cut my flowers using two shades of blue and one shade of pink Core'dinations card stock.  I used the Flower Shoppe Cricut cartridge and cut the basic and scalloped flowers at 4" and 4 1/2".  I cut enough leaves from that same cartridge at 1" to put two leaves with each flower.  I rolled the flowers, gluing them as I went, and set them aside.  I put the flowers on the tree in a random pattern.  I then added little foam red berries that were left over from my daughter's wedding.  I added a three dimension star to the top of the tree using my Life's A Party Cricut cartridge cut at 1 3/4".  I added some glue and Diamond Dust to the star.

It really was a fairly simple project that I finished in less than two hours (not counting the many times that I ripped the flowers off and started over).  HA!

Hope you like it.  Maybe you too will want to do a funky Christmas tree!  Be inspired!


Click on the photos for a better look.


Closeup of Flower and Star


Monday, November 28, 2011

A Prayerful Get Well Card

Since I didn't put a sentiment on the front of this get well card, I needed to come up with a title for this post, so "prayerful get well card" it is.  It's sort of a play on the word "powerful," since I believe in the power of prayer.  I made this card for a neighbor who had open heart surgery last week.  She is pretty young to be having double bypass surgery.  I'm not positive of her age, but I think she's about 48.  She's had a few rough times in her life, surviving cancer twice, and now this.  I plan to take a meal to her and her husband when she gets home from the hospital, and I will give her the card with the meal.  Here are the details of the card:

Size:  5 1/2" x 5 1/2"
I don't take credit at all for this card.  The credit all goes to Kittie Caracciolo at Kittie Krafts.  Check out her blog here.  She makes amazing cards and gives great tutorials.  I even pinned one of her cards on Pinterest with the caption, "Someday, I'll be able to make cards this pretty (hopefully)."  Thanks Kittie!
Card stock:  American Crafts; Recollections
Bible:  Inspired Heart Cricut Lite cartridge cut at 4 1/2".  When this cartridge came out, I really wasn't that thrilled with the images.  I decided to buy it a few weeks ago when I found it at a steal for $12.50 (with free shipping).  I thought it would be great for get well and sympathy cards, and so far I really like it.  The images are simple but well put together.   Obviously, I will only use a few of the images, but for the price, it was well worth it.
I embossed the gold and background papers using my Cuttlebug (my second favorite toy, after my Cricut).
Flowers:  Punches -- using one of Kittie's great tutorials -- check it out here. (I didn't have one of the punches she used, so I improvised with what I had and used a little gold Stickles in the center.)
Leaves:  Martha Stewart punch as well as a Spellbinders Leaf die (love it).

Click on the photo for a better look.  I hope you like it.  Be inspired!


Thursday, November 24, 2011

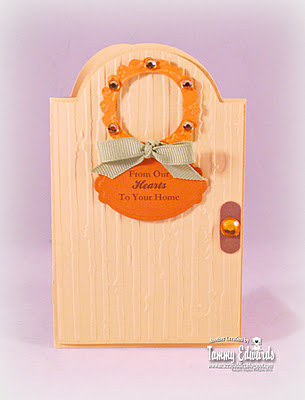
From Our Hearts to Your Home

To all of my fellow Americans, Happy Thanksgiving.  I hope God has blessed you beyond measure today and every day.

Today I am sharing with you a card that I made for our ladies' group at church to give a local family who needed a little extra help this Thanksgiving.  We added a gift card to a local grocery store in the card.  The inside reads, "May God bless you and your family this Thanksgiving."

Here are the details of the card:

Size:  A2
Card shape:  I used the Life's A Party Cricut cartridge cut at 5 1/4" using the card feature for the R.I.P. card (p. 38 in the handbook).  I thought it made a good looking door!  I embossed it with my Cuttlebug and added an extra layer for dimension.
Wreath:  Elegant Edges Cricut cartridge cut at 2 1/4" using the frame feature and a scalloped circle.  I then embossed it as well and added some little gems and a bow to look like a wreath.
The door knob of course is a gem.
The sentiment was computer generated and then cut using a Spellbinders Nestabilities die.

Hope you like it.  Be inspired!