Friday, December 30, 2011

Christmas and Snowflakes

Who doesn't love snowflakes when thinking about Christmas?  This card is for my wonderful in-laws.  The family gave them money for Christmas (mainly because we couldn't think of anything else to give them).  They can spend it on a trip or for unexpected expenses.   There is a spot on the inside to stash the money.  Also, this card was made for the latest die cut challenge over at Stuck On U Sketches.  We were to use snowflakes.  Here is how I made the card:

Size:  4" x 7"
Card stock:  Core'dinations and American Crafts
Patterned papers:  My Mind's Eye Wonderful Winter pad
Snowflakes:  I used three different punches for the snowflakes around the sentiment, including Martha Stewart and a Paper Shapers punch.  The snowflake border was cut using the Martha Stewart Seasonal Cake Cartridge.  I cut it using the "cut to length" feature at 4", which ended up cutting it at 2 1/2".  I cut the top layer twice and used pop up dots.  I also ran it through my Cuttlebug using the Swiss Dots embossing folder.  I then used a 3/4" circle punch for the red centers.
The verse is my own creation, using a verse I found on the internet as a starting point.  I attempted to make the words look like a Christmas tree.  Did it work?  LOL.  I used a large circle Spellbinders Nestabilities die to cut the sentiment and then added a Nestabilities Lacey Circle behind it.

Hope you like it.  Come join us in the fun and try this snowflake challenge! Check it out here.
Be inspired!

Click on the picture for a better look.


Friday, December 23, 2011

Christmas Blessings

I am sharing with you a Christmas card I made for my boss.  In fact, it is the only Christmas card I made!  I was giving him gift cards for Christmas, so I needed a way to give them to him.  I just don't think I can purchase a card in a store again, so this one was quickly done.  Here are the details:

Size:  4" x 9"
Papers:  Card stock:  Recollections and Bazzill
Patterned Paper:  Wonderful Winter by My Mind's Eye from a couple of years ago.
Christmas Bell Ornament:  Jolly Holidays Cricut Lite cartridge cut at 3"
Oval Label Behind Ornament:  Nestabilities
Snowflakes:  Paper Shapers punch with added gems from my stash
Border:  Spellbinders Fleur De Lis Doily Accents
Sentiment:  Computer generated and punched using a 1" circle punch and a 1 1/2" scalloped circle punch.  I then added some Stickles.

Hope you like it.  Be inspired!


Monday, December 19, 2011

It's Your Day!

I am sharing with you today a card I made over a month ago for a co-worker.  I've been so busy that I'm just now getting around to posting pictures of it.  It certainly isn't a really fancy card, but she liked it, and that is the most important thing.  Here are the details as I remember them (since it's been so long ago).

Size:  5 1/4" x 5 1/4"
Patterned papers:  Recollections
Card stock:  Bazzill, Recollections and American Crafts
Flowers:  Prima (I used a large glass brad for the center)
Flourish:  Storybook Cricut cartridge cut at 2 1/4"
Sentiment:  Computer generated and punched with a Stampin' Up Punch
Pearls:  Queen & Co.
Ribbon:  Unknown.


Be inspired!

Monday, December 12, 2011

Praying For You

I have been busy, busy, busy!  I suppose the season is upon us to be busy, huh?  I love the Christmas season though!  This is a card I made a few weeks ago for a lady who attends our church who fell and broke a rib.  I used the Inspired Heart Cricut Lite cartridge (cut at 4 1/2"), along with a flower punch and a branch punch.  I embossed the top white layer as well.  Pretty simple, huh?  But I liked the end result.  This cartridge has lots of great, simple cuts for making get well and sympathy cards.

Hope you like it.  It's been pretty quiet around here lately.  I'm not sure why.  I miss the comments though!  Be inspired!


Tuesday, December 6, 2011

Sending Birthday Wishes

Happy Tuesday bloggers!  Today I am sharing with you a birthday card I recently made for a former co-worker.  This friend is battling cancer, and the doctors have actually told her that she only has a couple of months to live.  If you are a praying person, I ask that you pray for her.  Her name is Tori.

I made the card to be sent from a bunch of people.  I cut an extra layer and glued it on the inside left of the card with a place to lift it up to allow more signatures.  We placed it in a central location in the office and had lots of people sign it.  I thought it would brighten her day to know that we were all thinking of her and care for her.  Here are the details of the card:

Size:  A2 (approx.)
Card stock:  Bazzill
Patterned papers:  My Mind's Eye
Card shape:  Wrap It Up cartridge cut using the card feature and cut at 5 1/4" (I think -- I made it two weeks ago.)  I was very happy to find that the layers from the main image on that page (page  31 of the handbook) fit onto the card feature.  So, I was able to cut layers in different papers.
Pearls:  Strand pearls that I purchased in the ribbon section at Hobby Lobby, and the individual pearls are Recollections.
Rose:  Recollections
Flourish:  Jolee's
Sentiment:  Computer generated
I added a little Stickles to the flames for a touch of bling, and it was done!


Thanks for looking, and be inspired!

Friday, December 2, 2011

My Funky Flower Yarn Christmas Tree

Happy Friday!  I am sharing with you today my project for the latest die cut challenge over at Stuck On U Sketches.  Our theme is "O Christmas Tree."  Sounds simple enough, right?  My only problem was that I had a vision in my head that didn't come to pass.  I love the yarn Christmas trees I have seen on Pinterest.  They are each unique.  And so is mine.  :o)  It is definitely funky.  And fun.

Here are the details:

I started with a white Styrofoam Christmas tree (this one is approximately 12 inches tall) purchased at Michaels.  I bought some thick white yarn and wrapped it around the entire tree, using my hot glue gun along the way.  I then added a string of little white pearls (which you can see in the closeup below).  I cut my flowers using two shades of blue and one shade of pink Core'dinations card stock.  I used the Flower Shoppe Cricut cartridge and cut the basic and scalloped flowers at 4" and 4 1/2".  I cut enough leaves from that same cartridge at 1" to put two leaves with each flower.  I rolled the flowers, gluing them as I went, and set them aside.  I put the flowers on the tree in a random pattern.  I then added little foam red berries that were left over from my daughter's wedding.  I added a three dimension star to the top of the tree using my Life's A Party Cricut cartridge cut at 1 3/4".  I added some glue and Diamond Dust to the star.

It really was a fairly simple project that I finished in less than two hours (not counting the many times that I ripped the flowers off and started over).  HA!

Hope you like it.  Maybe you too will want to do a funky Christmas tree!  Be inspired!


Click on the photos for a better look.


Closeup of Flower and Star


Monday, November 28, 2011

A Prayerful Get Well Card

Since I didn't put a sentiment on the front of this get well card, I needed to come up with a title for this post, so "prayerful get well card" it is.  It's sort of a play on the word "powerful," since I believe in the power of prayer.  I made this card for a neighbor who had open heart surgery last week.  She is pretty young to be having double bypass surgery.  I'm not positive of her age, but I think she's about 48.  She's had a few rough times in her life, surviving cancer twice, and now this.  I plan to take a meal to her and her husband when she gets home from the hospital, and I will give her the card with the meal.  Here are the details of the card:

Size:  5 1/2" x 5 1/2"
I don't take credit at all for this card.  The credit all goes to Kittie Caracciolo at Kittie Krafts.  Check out her blog here.  She makes amazing cards and gives great tutorials.  I even pinned one of her cards on Pinterest with the caption, "Someday, I'll be able to make cards this pretty (hopefully)."  Thanks Kittie!
Card stock:  American Crafts; Recollections
Bible:  Inspired Heart Cricut Lite cartridge cut at 4 1/2".  When this cartridge came out, I really wasn't that thrilled with the images.  I decided to buy it a few weeks ago when I found it at a steal for $12.50 (with free shipping).  I thought it would be great for get well and sympathy cards, and so far I really like it.  The images are simple but well put together.   Obviously, I will only use a few of the images, but for the price, it was well worth it.
I embossed the gold and background papers using my Cuttlebug (my second favorite toy, after my Cricut).
Flowers:  Punches -- using one of Kittie's great tutorials -- check it out here. (I didn't have one of the punches she used, so I improvised with what I had and used a little gold Stickles in the center.)
Leaves:  Martha Stewart punch as well as a Spellbinders Leaf die (love it).

Click on the photo for a better look.  I hope you like it.  Be inspired!


Thursday, November 24, 2011

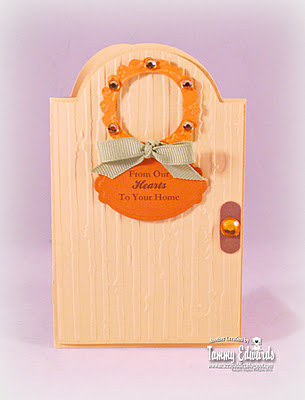
From Our Hearts to Your Home

To all of my fellow Americans, Happy Thanksgiving.  I hope God has blessed you beyond measure today and every day.

Today I am sharing with you a card that I made for our ladies' group at church to give a local family who needed a little extra help this Thanksgiving.  We added a gift card to a local grocery store in the card.  The inside reads, "May God bless you and your family this Thanksgiving."

Here are the details of the card:

Size:  A2
Card shape:  I used the Life's A Party Cricut cartridge cut at 5 1/4" using the card feature for the R.I.P. card (p. 38 in the handbook).  I thought it made a good looking door!  I embossed it with my Cuttlebug and added an extra layer for dimension.
Wreath:  Elegant Edges Cricut cartridge cut at 2 1/4" using the frame feature and a scalloped circle.  I then embossed it as well and added some little gems and a bow to look like a wreath.
The door knob of course is a gem.
The sentiment was computer generated and then cut using a Spellbinders Nestabilities die.

Hope you like it.  Be inspired!


Sunday, November 20, 2011

It's Your Day!

Happy Monday everyone.  For those of you who live in the U.S., I hope you will get to enjoy a short week (if you work outside the home), and a great Thanksgiving day with your families, eating lots of good food!

I am sharing a birthday card I made for a co-worker who celebrated her birthday last week.  She is a wonderful card maker, so I'm always intimidated to make cards for her.  She and I have been talking about the Life's a Party cartridge, so I wanted to make a card for her from that cartridge.  Here are the details:

Size:  A2
Card Stock:  Bazzill, Recollections, American Crafts
Card Shape:  This is one of the many great shaped cards from the Life's A Party Cricut cartridge.  I believe this one was from the 50th birthday.  I went into Cricut Craft Room and used the "hide contour" feature to hide the "50" that would have cut out on the front.  I really wouldn't have had to do that though, since my sentiment would have covered it.  (I would have needed to cover it on the inside though.)  I also embossed the card front using my Cuttlebug and the divine swirls folder.
It's Your Day:  This is a phrase on the Life's a Party cartridge.  I cut it at 1 3/4" and added the shadow.
Label behind Sentiment:  Elegant Edges Cricut cartridge cut at 3"
Flower:  Flower Shoppe Cricut cartridge -- I think it was cut at 4 1/2" with some glitter added.  I used the Retro Paper Shapers flower punch to make the leaves behind the flower.
I added some yellow Stickles to the candles to highlight the flames and used a border punch at the bottom.
I added a satin ribbon bow using my Bow Easy, and it was done.

Hope you like it.  Click on the photo for a better look.  As always, be inspired!


Thursday, November 17, 2011

Happy Thanksgiving Charger

It's another wonderful weekend coming up.  I hope everyone gets to do a little something crafty!  I am sharing with you today our latest die cut challenge over at Stuck On U Sketches.  The challenge was to use something related to "Thanksgiving Table."  I have to say this was a tough one for me.  I had no Thanksgiving pictures showing food, and didn't really need a Thanksgiving card, and just couldn't think of what to do for this challenge.  Then I remembered doing my Christmas charger last year.  See this post for a peek at it, in case you missed it last year.  I decided I'd love to have one for Thanksgiving.  Once I figured out what to do, I had fun!  Here are the details:

Charger:  Purchased at AC Moore  (It already had the crackled look.)
Circle in Center of Plate:  George Cricut cartridge cut at 8"
Cornucopia:  Celebrate with Flourish Cricut Lite cartridge cut at 4" -- I then did a little embossing with my Cuttlebug on some of the pieces.
Leaves:  Flower Shoppe Cricut cartridge cut at 2 1/4" -- I chalked the edges and used a stylus and foam pad to give them some definition.
Acorns:  Create a Critter cartridge cut at 1 1/4"
Happy Thanksgiving:  Martha Stewart Seasonal Cake cartridge cut at 3" (I think)
Vine at bottom:  Martha Stewart Seasonal Cake cartridge cut at 2 3/4" (I think)
Turkey:  Celebrate with Flourish Cricut Lite cartridge cut at 2 1/2"

Come on -- join us for this cool challenge.  What will you come up with?  You can find the challenge and other designers' creations here.

Thanks for looking, and be inspired!

Click on the photos for a better look.


Monday, November 14, 2011

Congrats Retirement Card

This is a card I made a few weeks ago for a co-worker who retired.  It's one of those, "It's not my favorite" cards.  You know the kind -- the ones that don't come easy, and you keep on re-doing them until you decide you're done, and you still don't like them.  LOL.

Here are the details:

Size:  A2
Card stock:  Recollections, Bazzill and Bazzill Bling
Patterned papers:  DCWV (La Creme Stack)
This really is a simple card.  I punched the flowers from the patterned paper with a square punch.  The green shadow was cut using my Cricut and the George cartridge, cut at 1 1/4".  The scalloped squares are a punch as well.
The sentiment was computer generated and punched with circle punches and a scalloped circle punch behind them.  I added little punched flowers and pearls, ribbon, and a bow, and it was done!

This picture was taken with my phone, so I apologize for the quality!

Thanks, and be inspired!


Wednesday, November 9, 2011

Chirp Spotlight

I was so very excited to get an email from Provocraft stating that my Fall Banner (see this post) would be in their customer spotlight.  I have submitted projects before, but they were never chosen.  So, this was especially exciting and fun.

So, here is a link to the Chirp newsletter that showcases my project.

Just had to share my joy!

Tuesday, November 8, 2011

Mr. & Mrs.

I am sharing with you a wedding card I made a few weeks ago for a wonderfully sweet couple.  The bride has been a friend of my daughter for at least 14 years.  She is a photographer and loves everything vintage.  Thus, I tried to make their wedding card look a little vintage as well.  Here are the details of the card:

Size: A2
Card stock:  Recollections and Core'dinations
Embossing:  Cuttlebug
Lace and ribbon:  From my stash
Rose:  Flower Shoppe Cricut cartridge cut at 5"
Leaves:  Martha Stewart punch
Sentiment:  Computer generated (attempting to use a vintage typewriter font).  I then used a Stampin' Up punch to punch it out, and added a little ink to the edges
I also added a brown cording bow.

Hope you like it.  Thanks for commenting, and be inspired!


Thursday, November 3, 2011

Fabulous Fall Fun

Happy, happy Friday!  Today is another reveal day over at Stuck On U Sketches.  This week's challenge was to use a leaf or leaves on our project.  I just happened to have these adorable pictures of my granddaughter that I took in 2008 that were waiting to be used on a layout.  I love it when it works out that way.  Here are the details of the layout:

Card stock:  Bazzill and Core'dinations
Patterned papers:  Basic Grey (Origins), My Mind's Eye, DCWV (Rustic Stack)
Leaves:  Flower Shoppe for the large and medium size leaves (cut at 7 1/2" and 2") and for two of the three flowers.  I used a flower punch to make the leaves behind the flowers.  (The third flower is a Recollections flower.)  I ran the leaves through my crimper to give them some texture.
Small leaf banner:  Martha Stewart punch
Tree:  Bloom Lite cartridge cut at 2" layered on a 2" circle and a 2 1/2" scalloped circle cut using the Mini Monograms Cricut cartridge
"Top Note" (yellow background):  I had this in my stash, so I don't remember for sure, but I think this was cut using the Elegant Edges Cricut cartridge.
Fabulous Fall:  3 Birds on Parade Cricut cartridge cut at 2 1/4"
Fun:  Sizzlit Twinkle Toes font
Decorative strip of circles:  Basic Grey

Come and join us in the "leaf" challenge.  Click here to go directly to the challenge.

Hope you like it.  Thanks in advance to leaving a nice comment.  Be inspired!


Click on the photo for a better look.


Monday, October 31, 2011

Oh Dear, Another Year!

Good Monday morning!  Today I am sharing a birthday card made for a co-worker of 23 years.  I can just hear her saying, "Oh dear, another year!"  So, I think she will like this card.  Here are the details:

Size:  A2 (I scored it and folded it a little different to make it be a gatefold card.)
Card stock:  Recollections for the kraft paper and DCWV for the aqua, which was then embossed with my Cuttlebug
Patterned paper:  DCWV
Border at edge of fold:  EK Success scalloped border punch (Does anyone else have a problem with this punch in that it is supposed to have embossing, but it randomly shows up?)
Scalloped border separating top and bottom of card:  Martha Stewart diamond lace border punch
Fancy corner:  Cuttlebug die
Frame:  Bloom Lite Cricut cartridge cut at 3" (I'm wondering if anyone else has this cartridge and has noticed that the flower that is supposed to cut at the top doesn't cut.  If you press the layer key, you get a circle, or the frame -- no flower.)
Sentiment:  Computer generated and punched with a 2" circle punch and put behind the frame.
Butterfly:  Martha Stewart punch
Roses:  The white mini roses are from I Am Roses.  The blue rose was made using the Flower Shoppe Cricut cartridge cut at 3".  I used a Martha Stewart (Wal-mart - green) punch for the leaves.
Ribbon:  From my stash
Pearls:  I bought these from Katy Cards (a UK company that seems to have gone out of business --- I can't get their website to come up any longer.  :o()

I think that's about it!  I hope you like the card.  Be inspired!

I am submitting this card for the current challenge (#33) at Birthday Sundaes and the current challenge  (#32) over at Card Makin Mamas.


This is the card sitting in a holder so you can see the front as it looks when it is closed.


This shows the front of the card open a little so you can see the fold of the card.


Thursday, October 27, 2011

Memories of Barbara

Hello bloggers!  I am sharing with you a card I made for my neighbors.  If you have been following my blog for a while, you'll remember that I have posted a few cards that I made for my neighbor who was fighting cancer.  She passed away a year ago on October 25th.  She left behind a husband and two teenage daughters.  She was an amazing lady with a positive attitude that kept shining through to the end.  I wanted her family to know that we had not forgotten about her.

Here are the details of the card:

Size:  4" x 8 1/2" (to fit in a no. 10 envelope)
Card stock:  Bazzill and American Crafts
Patterned paper:  My Mind's Eye (I think?)
Lattice border:  Martha Stewart double edge border punch
Lamp post:  Mini Monsters Cricut cartridge cut at 7" (hard to believe it would come from that cartridge, huh?)  I do not like the embossing, but it was done and I didn't want to start over!  The small signs were computer generated.
Flowers:  Made from the Martha Stewart cornflower punch.  See this post for the awesome tutorial.  Thanks Kittie! The pink flower was made using the Retro flower punch (Paper Shapers?)
Leaves:  Spellbinders
Small roses:  I Am Roses

Here is my inside sentiment:


We remember:
Her beautiful smile that could light up a room;
Her vibrant personality;
Her positive attitude;
Her wit;
Her love for God and others.
Yes, it’s been a year, but we have not forgotten her.  May you be comforted to know what an impact she had on our lives.

Thanks for looking and for your comments.  You can click on the photo for a better look.  Be inspired!


Monday, October 24, 2011

Happy Birthday To You!

This is a birthday card I made for a co-worker who is celebrating her birthday today.  She is a few months younger than me, and enjoys every minute of it!  Ha.  Here are the details of the card:

Size:  A2
Card stock:  Core'dinations; Bazzill (I used a Cuttlebug frame folder to emboss the front)
Patterned papers:  DCWV (rose paper)
Oval frame:  Elegant Edges Cricut cartridge cut at 4" (embossed using my Cuttlebug)
Scalloped border:  EK Success border punch (then embossed)
52:  Cuttlebug Baby Face font
Sentiment:  I used Word Art in Word to create the sentiment and made it into a circle and then punched it with a 1 1/2" circle punch.  I then went back and punched the middle out with a 1" circle.  I layered this with pop dots and then punched a 2" scalloped circle punch and put behind it.
Ribbon:  Satin from my stash
Flower:  Prima with a glitter dot added in the middle

Thanks so much for your comments.  Be inspired!

Click on the photo for a better look.


Friday, October 21, 2011

With Our Sympathy

Happy Friday everyone.  Although I hate that I needed to make a sympathy card for a friend at church who recently lost his father, I am excited to share this card with you, simply because I was happy with how it turned out!  As part of the current challenge over at Stuck On U Sketches, we were to use a fence on our project.  While trying to think of how to use a fence, it came to me that I could use one on a sympathy card.  Yep, that works!  Then I noticed that the cut I had decided to use really was a fence with a gate, so I did a little research and found a Bible verse that worked great for a sympathy card!  Don't you love it when it all comes together?!?   


Here are the details of the card:


Size:  A2
Patterned paper:  Unknown (I've had this paper forever!)
Card stock:  American Crafts; Wausau (center of sun), Bazzill Bling (grass)
Fence:  Bloom Cricut Lite cartridge cut at 2 3/4"  I added Stickles to the flowers for a touch of bling and green pearls to the centers.
Clouds:  Zooballoo Cricut cartridge cut at 1 3/4" and embossed using my Cuttlebug
Sun:  Create-a-Critter cut at 1 3/4"
Butterflies:  Martha Stewart punch
Grass:  Fiskars border punch
Sentiment:  Computer generated and punched with a McGill punch
Inside I used the following Bible verse:  “Blessed are those who wash their robes, that they may have the right to the tree of life and may go through the gates into the city." (Revelation 22:14)  
I also added the following personal message:  May you be comforted to know that your Dad has passed through the gate and is resting in the arms of our Savior.


Hope you like it.  As always, thanks for taking the time to leave a nice comment.  They really do make me want to make something else and share it with you!


Are you on the "fence" about trying this challenge?  LOL.  Come on over and join us.  Details and inspiration can be found here.  Be inspired!


Click on the photo for a better look!


Monday, October 17, 2011

You're The Best (for my Boss)

I hope everyone had a great weekend.  We just got back from a mini vacation to Florida.  What fun.  It was so nice to get away.  We had to cancel two trips previously this year, one to the Outer Banks of North Carolina when my son-in-law's Dad passed away, and a trip to Southport, North Carolina for our anniversary when my husband fell and broke his heel and had surgery the day before our anniversary.  So, seeing the ocean and putting my toes in the water was a huge blessing for me.  And to top it off, we got to spend four days with our daughter, son-in-law, and grandchildren who were there spending the week.

I am sharing with you today a card for my boss.  Today is officially Boss' Day.  And I have a great boss, so I want to let him know that I appreciate him.  I've worked for him for 23 years, so I suppose he plans to keep me.  LOL.

Here are the details of the card:

Size: A2
Card stock:  The case base was purchased in a package of kraft cards made by The Paper Studio.  The metallic paper used for the background is Recollections.
Patterned paper:  DCWV
You're The Best:  Cuttin' Up Cricut cartridge cut at 3"
Scalloped rectangle:  Elegant Edges Cricut cartridge cut at 4"
Leaves:  Martha Stewart punch, using Recollections metallic paper.  I used a stylus to add the veins
I also used my Stampin' Up ticket punch on most of the corners and added some criss-crossed ribbon.
I also added a touch of black Stickles around the edge of the black paper.

Hope you like it.  Click on the picture for a better look.  The picture was taken with my phone because my camera is at my daughter's house in the suitcase she brought back for us (so we wouldn't have to check luggage).  So, I don't think the quality is that great, but it will do!

Thanks for any comments you leave.  Be inspired!


Friday, October 14, 2011

May You Be Strong

I hope everyone has had a great week!  I am sharing with you today a card I made a few weeks ago for my son-in-law's father.  He had to have surgery suddenly because of an internal hernia, so I wanted to make a card for him to let him know that we were praying for him.  Here are the details of the card:

Size:  A2
Card stock:  Bazzill Bling, American Crafts
Patterned paper:  DCWV
Title:  Computer generated
Stars:  McGill punches
Embossing:  Stars embossing is a Paper Studios embossing folder
The yellow paper was embossed with lines when I purchased it.  The manufacturer is unknown.
Border punch:  Fiskars border punch
Frame:  Elegant Edges Cricut cartridge
Strong boy:  A Child's Year Cricut cartridge
Inside sentiment:  "and well again soon is our prayer."
Pearls:  Queen and Company

Thanks so much for looking, and for your comments.  Have a great weekend!  Be inspired!


Wednesday, October 12, 2011

Woo hoo! Top 5!

I was so happy to see that I made Top 5 at Fantabulous Cricut as part of their pumpkin challenge!  What an honor!  It sure made my day.

Friday, October 7, 2011

Give Thanks Banner

TGIF again!  I wonder if anyone is as excited as I am about it being Friday.  LOL.  And to top it off, I can share with you my banner I made last weekend.  I've been thinking about making one of these for a while, and since the die cut challenge this week over at Stuck On U Sketches was to use a tree on your project, it was time to make a banner!  I put quite a bit of time into this banner, but I was very happy with the result.  I think it looks great hanging on my mantle!  I hope you will join us and make something with a die cut tree on it for this week's challenge!  And be sure to check out the other designers' creations by clicking here.

Here are the details for the banner:

I used the Elegant Edges Cricut cartridge (my all time favorite) and stretched the swirl1 design on page 25 of the handbook using Cricut Craft Room.  I was even able to make a layer with a decent shadow -- woo hoo!  Each background piece for the banner is 5" wide x approx. 6 1/2" long.
Scalloped ovals:  Elegant Edges cut at 5 1/4"
Letters:  Storybook Cricut cartridge cut at 4 1/2" and then embossed using my Cuttlebug
Top borders:  Various border punches and Bazzill Just the Edge strips
Tree:  Stretch Your Imagination Cricut cartridge cut at 5 1/4" (I added some Stickles to the leaves.)
Pumpkins:  Create-a-Critter Cricut cartridge cut at 1 1/2" and 1" (embossed with my Cuttlebug)
Flowers:  Recollections (most of them anyway, two were made with my Cricut - see below)
Butterflies:  Martha Stewart punch
Leaves:  Spellbinders die
Grass:  Fiskars border punch
Bible verse:  Computer generated and punched using a McGill punch
Rolled flower:  Flower Shoppe Cricut cartridge cut at 5" and one cut at 6 1/2".  I decided the 5" rose was a better size cut.  It was easier to work with.  I have a closeup of this flower below.

I also submitted this for the current "pumpkin" challenge over at Fantabulous Cricut!

I think that's about it!  I hope you like it as much as I do.  Click on the pictures for a better look.  Thanks in advance for any comments you leave.  Be inspired!


My die cut tree!


Here is a closeup of my rolled flower.  I added a little Stickles.